Frying is the cornerstone of your kitchen.
If it’s not, it is certainly a contributor to your bottom line.
Nation’s Restaurant News (NRN) recently reported on the Top Ten Fastest Growing Chains in the U.S. Of these ten, 50 percent of the chains offer fried food items on their menus. This same fried food trend can be seen across the Top 100 U.S. Chains reported by NRN.
Datassential’s 2017 Fried Menu Trends Report gives insight into the growing popularity of several fried appetizers, including fried pickles, sweet potato and waffle fries. The continued popularity of fried foods and their ability to drive consumer preference makes a smart frying operation all that much more important. It is about more than just producing a tasty product, but rather ensuring you are maximizing your frying oil’s life span, your kitchen efficiencies and your guest experience.
There may be several ways to accomplish these goals — none of which will be possible if your frying program is guilty of committing some common frying mistakes. Avoid these five mistakes and you’ll put your business on the path to frying success.

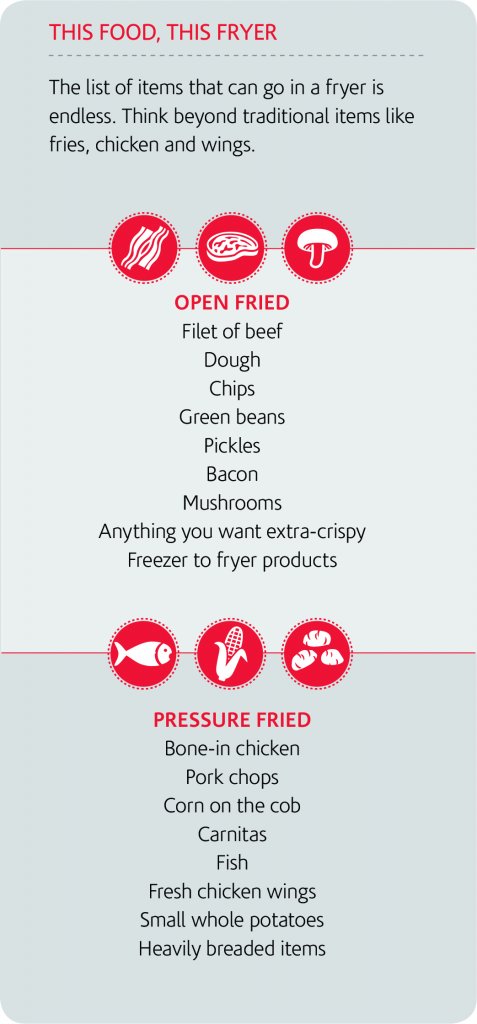
First things first. If the proper equipment is not being used, the rest of these points will not matter much. Knowing the difference in abilities between an open and pressure fryer or knowing when to use a standard versus a low volume fryer may be all it takes to bring your business to the next level.
OPEN VS. PRESSURE FRYER
Although a menu item may be cooked in any type of fryer, some fryers are better suited for certain applications. Open fryers are standard in today’s kitchens, primarily due to their flexibility. Breaded and non-breaded items, proteins, vegetables, and especially French fries, can all be cooked to golden, delicious perfection in an open fryer. Pressure fryers really shine when it comes to cooking larger proteins and proteins on the bone. The science behind pressure frying seals the moisture in the protein and then cooks the product with its own juices. This cooking method leads to a juicier and tastier product, be it anything from chicken to pork to even a filet mignon, and it can do it 30 percent quicker than open frying.
FRYER SIZE
Once you have decided which frying platform best suits your menu needs, you will need to determine a fryer size that can adequately address your current and potential throughput demands. This can be done in a variety of ways. Some issues to consider are how many vats you will need, what the size of those vats should be, and what will the
oil capacity/filter frequency be for each of those vats — certainly a lot to consider.
In the open frying platform, traditional fryers use about 50-65 lbs. per vat, an important feature for those with heavily breaded products. These high volume fryers are also great for “floating” product and if you are cooking a variety of products and are not concerned about flavor contamination.
Newer technology in the open platform category uses reduced oil volume — close to 30 lbs. — and removes what is known as the “cold zone.” This is where fall-off and crumbs accumulate and can stay cool. Removal of the cold zone means you have to dispose of crumbs more frequently so they do not burn. This also means more frequent express filter cycles which can run between four to six minutes and happen between cooking drops. These maintenance cleanings happen quickly mid-use to help your oil life, allowing you to maintain the same product throughput and do it with roughly 40 percent less oil.
For pressure frying, the difference in vat size is based on the number of pieces of chicken you are producing, called “heads.” In the US, we traditionally consider a whole chicken (breasts, legs, wings and thighs) to be one “head” of chicken. There are options that allow you to produce four (32 pcs), six (48 pcs) or even eight heads (64 pcs) of chicken. Some vats are round, and some vats are rectangular and come with a basket or a racking system, best for the eight head runs and simplifying production. Lower oil volume options for pressure fryers are few and far between. But, they do exist, and it is a fair question to ask when shopping for equipment.
Frying oil is one of the most costly food items in your kitchen. If you are not protecting it, you are wasting it. Fortunately, we know precisely which elements can harm your oil, and we know how to avoid or, at the very least, combat these common oil “enemies.” To help in identifying these enemies, remember the acronym HAMSS and you will be on your way to saving money and improving quality.
HEAT
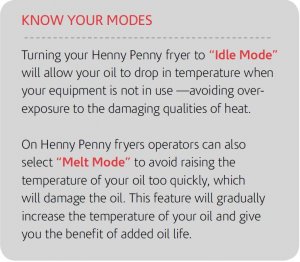
 You cannot avoid it, but you can manage it. When you are not actively using the fryer, turn the temperature down. Any time you can lower the temperature by 18 degrees Fahrenheit, you effectively double the life of your oil. Likely, the time needed to return to the appropriate cooking set point is a fair exchange for the money saved. The best practice to lower your oil’s temperature is by utilizing features such as “Idle Mode,”
which allows the oil to passively cool off instead of manually lowering the set point of the oil.
AIR
Exposure to air does diminish oil quality over time. Oxidation occurs when oil comes in contact with air. Cover your oil with vat covers when not in use, such as at night or during off-peak hours, and you will make strides towards oil life extension. Once filtered, do not needlessly pump oil through the filter, which introduces more air and will increase the damage to your oil. Five to ten minutes of polishing per day is optimal.
MOISTURE
Contact with moisture is the biggest culprit in the deterioration of cooking oil. Every item you fry contains moisture, especially proteins. The process of frying extracts moisture from the items being cooked, which enters and damages the oil. There are still precautions that can be taken to avoid introducing excess moisture to your oil. For instance, never fill baskets directly over the fryer and always shake out water or ice crystals before dropping in product.
SALT
Salt is like sand; it gets in everything. As salt breaks down oil and causes foaming, it’s best to keep it away from your fryer. Never salt directly above the fryer vat, instead try integrating a procedure of salting product at a station. Review your kitchen’s workflow to ensure that food items are being seasoned after the fryer and that brined items are drained adequately before being placed in the vat.
SOAP
Soaps and detergents can rapidly break down oil. Alkaline liquids, such as cleaning chemicals, create soap when combined with oil. Soap reacts with oil and causes off flavors, dark colors, off odors and foaming. Use only the cleaning solutions recommended by the fryer manufacturer and follow the directions carefully. Keep lid covers in place especially during clean up and always use a vinegar rinse to
neutralize the detergent.
We know oil is expensive, and we know that in the hustle and bustle of a kitchen, especially during peak hours, standard maintenance can get forgotten — and justifiably so. Activities are typically prioritized to meet customers’ expectations. But when there’s some down time available, integrating a process within your organization to check the quality of your oil is important.
SO WHAT ARE YOUR OPTIONS?
There are inexpensive methods including an oil color reference kit which is pre-filled tubes that are colored to represent the discard point of oil. With these kits, you match the color in the vat to the tubes and determine if it is time to dispose. There are also strips that can be dipped into the oil and have squares that turn from blue to yellow to indicate whether or not the oil should be discarded. The risk with both of these ‘consumable’ options is the potential for user error. You will have to depend on a teammate to understand and act on the information they see.
Non-consumable options for oil testing include a handheld option (a calibrated handheld tool that is kept in a case and stored separately from the fryer) and an integrated oil measurement feature built-in to the fryer. These two options can be a more expensive proposition, but add important objectivity to your oil measurement process. With these methods, you will receive a TPM (total polar materials) reading — a number that will correlate to a level that you have determined to be the disposal point for your operation.
Now, a teammate simply has to press a button, receive the numerical reading and continue to use or dispose the oil. Although it is a non-consumable option, there could be a replacement cost for the handheld tool if it is damaged or misplaced. For both of these “equipment” options, there will need to be a schedule to ensure the calibration is right on and you are getting accurate numbers. These calibration
exercises can be every year to every 2-3 years, depending on your operation.
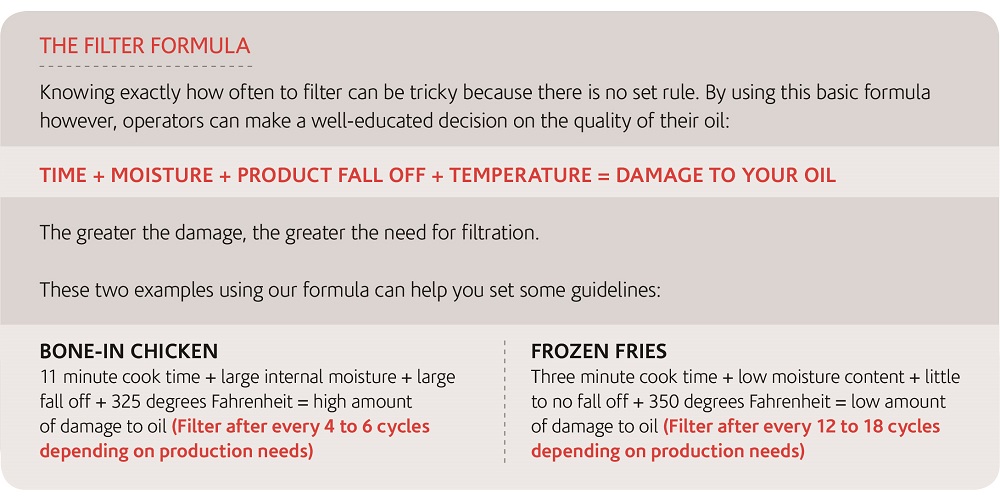
Your oil comes in contact with those harmful elements every day, which is why having a filtering program is so important. The key to oil life longevity is fast, frequent filtration to quickly remove anything harmful that has entered your oil. Finding the best number of cycle runs between filtering is a balancing act. Any filtration is good but productivity needs to remain as high as possible at the same time. There is a filtering schedule sweet spot that will produce the best product and ensure the longevity of your oil. (See box on bottom of page.)
One key player in optimizing filtration is a powder or pad that can be used to scrub the oil once a day. Products such as a filter powder are complementary to your filtering practices. This powder is added to your oil and works by attracting and gathering particulate in the oil, making it too large to pass through the filter screen, and separating it from the clean oil. Some of these products can double oil life, but be sure to pay close attention to the directions. When used for over 10 minutes, you can damage your oil needlessly. This practice is something that is best done in small doses to protect your oil. (See chart bottom of page.)

 You have made the investment in quality kitchen equipment, and while the equipment can do a lot for you and your business, it cannot do it alone. It is important to give your staff proper training and failing to do so could lead to less than optimal food quality and poor customer service, ultimately costing your business money. Here are a few situations in which the lack of training can impact the bottom line:
- Employees who are intimidated by or unsure of the filtering process will avoid the task. Inconsistent filtering will lead to lower quality food and higher costs.
- Incomplete training can result in staff members that rely on the assistance of others, pulling them away from their duties and interrupting the efficiency of the kitchen.
- The inefficient work flow brought on by the lack of training leads to delays in even basic operating and maintenance procedures, resulting in longer waits for customers which can drastically impact the customer experience.
- Inability to properly monitor oil quality and make educated decisions on when oil should be discarded or kept can lead to oil being thrown away too early, which costs your business money. On the other hand, oil kept around too long seriously impacts food quality.
Individually, each of these mistakes can stand as seemingly harmless and minor. However, if the same mistakes are made time and time again, or worse yet, more than one of these mistakes is going uncorrected, business owners put themselves at risk of operational inefficiency. Avoid these five frying faux pas and you will put your business on the path to frying success. To ensure that you are getting the most out of your kitchen’s frying practices, self-analyze your kitchen using the included Kitchen Audit Form. To review the findings of your audit, contact us today.


